- February 21, 2025NEWPostfixes v3 for WS.WebTV 61 available


Installation and Maintenance
Configuration
- • General
- • Google API Key
- • Login with Google
- • Login with Facebook
- • Vimeo API
- • GeoIP Service
- • Video
- • Video: Integrating AWS
- • Storage
- • Appearance
- • Appearance: Styler
- • Widgets
- ‹Ext› PlayerLogo
- ‹Ext› Site/Geo Blocking
Solving Login Problems
Statistics
Content Administration
- Introduction
- Channels and Pages
- Clips
- ‹Ext› StreamClip
- ‹Ext› EmbedClip
- ‹Ext› BatchCreator
- Ads
- Interactivities
- Categories
- Menus
- Galleries
- ‹Ext› News & Events
- ‹Ext› Scheduler
‹Ext› Adv. Users Manag.
- • Advanced vs Basic
- • Access Levels and Privileges
- • Privacy: Channels
- • Privacy: Clips
- • Privacy: Galleries
- • E-Mailing
- • DEV: Webhooks/Callbacks
‹Ext› Store
- • Introduction
- • Configuration: General, Built-In Products, Payment Methods
- • Getting your PayPal API Credentials
- • Selling Content Access, Memberships, Services, etc.
- • Order Management
- • Manual Payment Workflow
- • Managing Sold Content Access
- • Managing Subscriptions
- • User⇔Store Integration / Credit (BackEnd)
- • Sales Reports
- • DEV: External Payment Processor
- • DEV: Webhook/Callback
Advanced Customization
- • CSS "Shortcuts": Hiding Interface Elements
- • Default Images
- • Video Player: Parameters
- • Video Player: JS Functions and Events
- • Create/Edit Language Pack
- • Configuration Variables
- • Templates: General Considerations
- • Templates: Files
- • Creating a Style
- • Creating a Theme
- • Adding Templates
- • Adding Widget Zones
- • Adding Menu Zones
- • Add fields to User reg. form
- • Showing categories in content lists
- • Embedded Widgets
- • Using Custom DB Fields and List Filters for Clips
- • Back-End: Adding sections
Others
Advanced Customization
Adding fields to the User registration form
Rev. Aug. 18, 2017Description
Instructions on how to add extra fields to the Front-End User registration form.Tutorial requirements
• Your WebTV must have the Advanced User Management extension.• Knowledge of file management through FTP, and in general.
• HTML Knowledge (basic/medium).
By default, the WebTV User registration form request some basic information to the Users. For most clients, these will be enough, but others may need to request additional information that can be stored into the database.
These are the default fields you will find in the registration form:
Label |
ID/Name of the HTML form element *** Can't be changed *** |
| • Login • Password • Alias |
username password alias |
Other available fields that can be enabled by editing the registration template:
Label |
ID/Name of the HTML form element *** Can't be changed *** |
| • Gender - since version 1.4.1 • Name • Surname • Company • VAT • Address • Postal Code • Country (Country Code) - since version 2.2.0.3 • Country • Telephone • Birthdate |
gender name username company vat address postal_code country_code country telephone birthdate_y, birthdate_m, birthdate_d |
In order to enable/unhide additional fields, read the following instructions:
1. Locate the template files
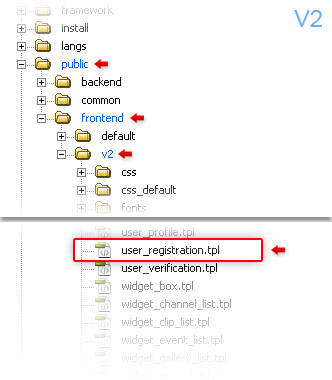
• "V2" Theme:
- public/frontend/v2/user_registration.tpl
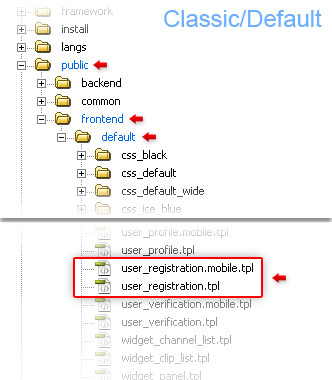
• "Classic/Default" Theme:
- public/frontend/default/user_registration.tpl
- public/frontend/default/user_registration.mobile.tpl (Mobile Interface)


2. Download the files to your computer and edit them
Download the files to your computer and edit them.
NOTE: You can use any plain text editor like Notepad, Notepad2, Notepad++, Dreamweaver, etc.
When editing the files you fill find several, commented, input fields (all possible fields which can be collected by the form): Simply uncomment the HTML blocks corresponding to the extra fields you want to collect; or do it the contrary: uncomment all blocks and comment the ones you don't want to collect.
In order to set a field as required it must have the class "required" like this:
<input name="name" id="name" type="text" class="field required" >....
If you want to set a field as optional, then remove the "required" class, like this:
<input name="name" id="name" type="text" class="field" >....
3. Upload and refresh
Upload the edited files to the server (overwriting existing ones) and refresh the WebTV page to see the changes.
Advice: Always keep track of any modification you make to the WebTV so you can re-apply it after updates or reinstallations.
Additional fields and other options (since version 1.4.1)
Additional fields
Besides the aforementioned fields, that can be handled by the WebTV which correspond to the database structure, you can add arbitrary extra fields that can be stored into the admin notes fields.
In order to enable the storage of additional form fields (and their formart), edit the WebTV configuration file (config/Config.inc.php) and add the following variables:
$REG_FORM_SAVE_EXTRA_FIELDS_IN_ADMIN_NOTES = true; // ops: true, flase
$REG_FORM_SAVE_EXTRA_FIELDS_FORMAT = "normal"; // ops: "json", "csv", "normal" ( field:value pair per line )
Sending all registration form fields by E-Mail
You can also configure the WebTV to send you all registration form fields, on new user registrations. To enable this feature, edit the WebTV configuration file (config/Config.inc.php) and add the following variable:
$REG_FORM_INCLUDE_IN_NOTIFICATION = true; // ops: true, false


