- February 21, 2025NEWPostfixes v3 for WS.WebTV 61 available


Installation and Maintenance
Configuration
- • General
- • Google API Key
- • Login with Google
- • Login with Facebook
- • Vimeo API
- • GeoIP Service
- • Video
- • Video: Integrating AWS
- • Storage
- • Appearance
- • Appearance: Styler
- • Widgets
- ‹Ext› PlayerLogo
- ‹Ext› Site/Geo Blocking
Solving Login Problems
Statistics
Content Administration
- Introduction
- Channels and Pages
- Clips
- ‹Ext› StreamClip
- ‹Ext› EmbedClip
- ‹Ext› BatchCreator
- Ads
- Interactivities
- Categories
- Menus
- Galleries
- ‹Ext› News & Events
- ‹Ext› Scheduler
‹Ext› Adv. Users Manag.
- • Advanced vs Basic
- • Access Levels and Privileges
- • Privacy: Channels
- • Privacy: Clips
- • Privacy: Galleries
- • E-Mailing
- • DEV: Webhooks/Callbacks
‹Ext› Store
- • Introduction
- • Configuration: General, Built-In Products, Payment Methods
- • Getting your PayPal API Credentials
- • Selling Content Access, Memberships, Services, etc.
- • Order Management
- • Manual Payment Workflow
- • Managing Sold Content Access
- • Managing Subscriptions
- • User⇔Store Integration / Credit (BackEnd)
- • Sales Reports
- • DEV: External Payment Processor
- • DEV: Webhook/Callback
Advanced Customization
- • CSS "Shortcuts": Hiding Interface Elements
- • Default Images
- • Video Player: Parameters
- • Video Player: JS Functions and Events
- • Create/Edit Language Pack
- • Configuration Variables
- • Templates: General Considerations
- • Templates: Files
- • Creating a Style
- • Creating a Theme
- • Adding Templates
- • Adding Widget Zones
- • Adding Menu Zones
- • Add fields to User reg. form
- • Showing categories in content lists
- • Embedded Widgets
- • Using Custom DB Fields and List Filters for Clips
- • Back-End: Adding sections
Others
Content/Administration > Clips
Create/Edit "Auto-Encoding" Clips
Rev. Aug. 10, 2016Description:
Step-by-step instructions on how to create an "Auto-Encoding" Clip in WS.WebTV.Requirements of this tutorial:
• Previous understanding on how to create Clips.• Your server/hosting must support FFmpeg 1.2+.
• WS.WebTV version 1.4.2+.
Notes:
• Version used for the screen captures: WS.WebTV Professional 1.4.2 and 1.7.5 (all extensions enabled). Some options/features might be different, respect your WebTV, depending on the installed version and extensions you have purchased.• The interface may be slightly different depending on the Web browser and operating system.
Auto-Encoding Clip
This kind of Clip, from a single video source file, will automatically generate the corresponding poster/thumbnail, video thumbnails (sprite), and will encode the different WebTV video qualities.
Storage: Source and resulting, encoded, files
It is worth mentioning how the storage is handled for this kind of Clip:
Source file: When you upload a source file, it will be stored (and will remain) in the local uploads/movies folder, regardless of the video storage setting of the WebTV. This is because FFmpeg is executed locally and it needs to access the file (locally...).
Resulting, encoded, files: Once the source file is processed, the resulting, encoded files will be stored according to the video storage settings of the WebTV:
- If the video storage is set to "Local" the files will be store in uploads/movies folder.
- If the video storage is set to "External Server (FTP)" the files will be stored in the external server and removed from the local storage.
- If the video storage is set to "AWS (Amazon S3)" the files will be moved to the Amazon S3 bucket and removed from the local storage.
In any case, the source file will remain in the local storage (uploads/movies folder) in case you want to re-encode (or get the thumbnails) again in a future. Please note that once the encoding processes ended for a Clip, if you think you won't need to process the source file again, then you can delete it using the corresponding option in the Media tab.
Creating an Auto-Encoding Clip
Important
In order to use this functionality, you need to enabled video encoding in the WebTV and make sure your server meets the requirements. Check the video configuration tutorial for more info.
By this time, you should be familiar on how to create and edit a Clip. If this is not the case, please check the "Clips: Create/Edit" tutorial before continue reading.
In the next steps we will focus on the main characteristic of this kind of Clip: the Media Tab.
To create an Auto-Encoding Clip...
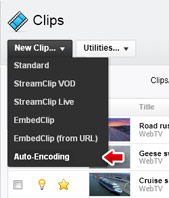
Click on "New Clip..." button and select "Auto-Encoding".

The "Media" tab...
From this tab you will be able to upload and process the source video file..

Drag and Drop Tip:
If you are using recent versions of Chrome/Safari, Firefox or Opera, you can drag and drop your video file to the "Browse and Upload" button.
Warning: Do not use special characters in file names.
Use, preferably, letters (a-z) and numbers (0-9). Some characters like "-" and "_" can be used.

Once your video was uploaded, the page will reload and the processing options will appear.
NOTES:
- Versions prior to 1.6.1 required you to click on Save or Revert in order for the processing options to appear.
- Since WS.WebTV 1.7.5 it is possible to configure the WebTV to send the encoding tasks (using the processing options selected below) as soon as the source video file upload finished. More info here.

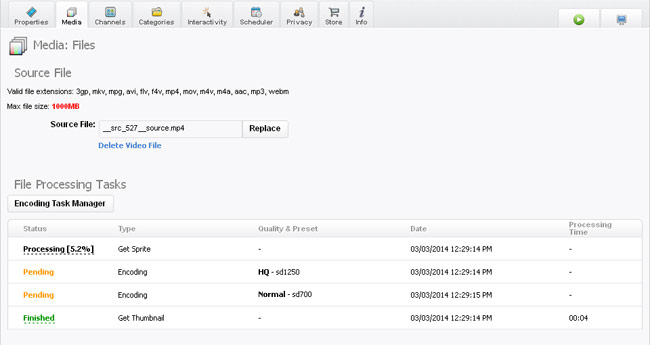
Select the desired processing options and click "Process Source File". The corresponding tasks will be added:

As you can see, you can check the progress of the tasks from from here; however, in order to manage all video processing tasks you must go to the "Encoding Task Manager" (only available to Admins).
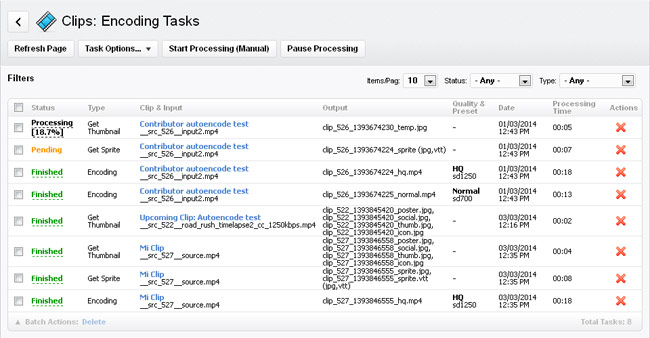
Encoding Task Manager

Through this interface, you will be able to manage all video processing tasks.
• Refresh Page: Updates the page (similar to F5).
• Task Options: To perform several actions on processing tasks.
- Retry Failed Tasks: Set all failed tasks as "Pending", so they can be processed again.
- Clear Failed Tasks: Delete all tasks with "Failed" status.
- Clear Finished Tasks: Delete all tasks with "Finished" status.
- Clear Pending Tasks: Delete all tasks with "Pending" status.
• Start Processing (Manual): To force the system to start processing the encoding tasks, in case it has not been started automatically.
NOTE: Between task execution there is an - intentional- delay of 5 seconds.
• Pause Processing: Pauses the continuous task processing. Please note that in case there is any task being processed, it won't be interrupted; however, once it finishes, the system won't start processing the next "Pending" task. In order to resume the continuous processing, use the "Start Processing (Manual)" option.
Troubleshooting
• If the WebTV does not display the option to create this kind of Clip, it could be because the encoding is disabled in "Configuration: Video", or because the WebTV could not detect FFmpeg in your server.• Encoding tasks appear as "Failed" but the log file can't be opened (it does not exist). This happens when the server does not save the output of the shell (shell_exec) encoding command to the log file. Possible causes for this could be:
- The source video file name contains "special" characters (like parenthesis) and these special characters are preventing the server to execute the encoding command (we have seen this happening on several servers). If this is the case, upload the source video file again (make sure its name only contains alphanumerical characters) and process the source video again.
- Other: The server is failing to execute the shell command (for whatever reason) and it is not saving the output to the log file. The recommendation in this case is to try the encoding command directly via shell/SSH and see what happens (the compression commands used on the encoding tasks can be found in WebTV logs: Statistics > Logs).
• Encoding tasks appear as "Failed" and, in the log file, you find the following error "Unknown encoder lib......aac". This means that the AAC codec used on the encoding command is not present in the FFmpeg installation. First check what AAC codec is available for your FFmpeg installation and then select the appropriate encoding presets folder in the WebTV configuration file (config/Config.inc.php). Then retry failed tasks and start the processing manually.
• Encoding tasks appear as "Failed" and, in the log file, you find the following error "Cannot allocate memory". That happens when the server is not allowing FFmpeg to use the necessary memory when executed through the shell_exec() PHP function. This is a server issue and, as such, only the hosting company/server administrator can do anything to fix it.


