- February 21, 2025NEWPostfixes v3 for WS.WebTV 61 available


Installation and Maintenance
Configuration
- • General
- • Google API Key
- • Login with Google
- • Login with Facebook
- • Vimeo API
- • GeoIP Service
- • Video
- • Video: Integrating AWS
- • Storage
- • Appearance
- • Appearance: Styler
- • Widgets
- ‹Ext› PlayerLogo
- ‹Ext› Site/Geo Blocking
Solving Login Problems
Statistics
Content Administration
- Introduction
- Channels and Pages
- Clips
- ‹Ext› StreamClip
- ‹Ext› EmbedClip
- ‹Ext› BatchCreator
- Ads
- Interactivities
- Categories
- Menus
- Galleries
- ‹Ext› News & Events
- ‹Ext› Scheduler
‹Ext› Adv. Users Manag.
- • Advanced vs Basic
- • Access Levels and Privileges
- • Privacy: Channels
- • Privacy: Clips
- • Privacy: Galleries
- • E-Mailing
- • DEV: Webhooks/Callbacks
‹Ext› Store
- • Introduction
- • Configuration: General, Built-In Products, Payment Methods
- • Getting your PayPal API Credentials
- • Selling Content Access, Memberships, Services, etc.
- • Order Management
- • Manual Payment Workflow
- • Managing Sold Content Access
- • Managing Subscriptions
- • User⇔Store Integration / Credit (BackEnd)
- • Sales Reports
- • DEV: External Payment Processor
- • DEV: Webhook/Callback
Advanced Customization
- • CSS "Shortcuts": Hiding Interface Elements
- • Default Images
- • Video Player: Parameters
- • Video Player: JS Functions and Events
- • Create/Edit Language Pack
- • Configuration Variables
- • Templates: General Considerations
- • Templates: Files
- • Creating a Style
- • Creating a Theme
- • Adding Templates
- • Adding Widget Zones
- • Adding Menu Zones
- • Add fields to User reg. form
- • Showing categories in content lists
- • Embedded Widgets
- • Using Custom DB Fields and List Filters for Clips
- • Back-End: Adding sections
Others
External APIs
Google Sign In: Configuring Google OAuth
Rev. May. 11, 2021Description:
Configuring Google Sign In on WS.WebTV.Google Sign In/Login
Since WS.WebTV v56, it is possible to enable User registration and login using Google. For this, it will be necessary to create an "App" in Google and then provide the "Client ID" and "Client Secret" to the WebTV. This document provides the information on the steps you need to follow in order to enable this functionality.
Stage 1: Important - Requirements:
1. Your WebTV must be running on HTTPS (the URL must start with https://...).
2. You must have a Google account.
3. Make sure to add and verify your Website (the URL of your WebTV AND the domain, BOTH) on Google's Search Console: https://search.google.com/search-console/
IMPORTANT: The Google account you use for creating the necessary API project for the Google Sign In, must be the same used for registering your site into Search Console.
4. The Privacy Policy!:
This is very important!. Make sure to have a well written, detailed, honest, Privacy Policy. This document must include details about the personal User data gathered and how it is used by the Website; it must also explain how to remove the user account.
Sample texts:
In the section of your document where you explain how have you obtained the User data (something like "How have we obtained your data?") you must indicate that you may gather data through/from:
Registration/login via Google or Facebook application.
In the section of your document where you explain the purpose of the gathered data (something like "For what purpose do we treat your personal data?") you must provide as much detail as possible. Example:
Registration/login via Google or Facebook application: When a User registers or logs in on our Website via Google or Facebook application, the system gathers the information which is essential to make the registration (in case the User is not already registered) or in order to verify whether the User already has an account in the system and grant the login. The data gathered in this process includes: E-Mail, Display Name, Name, Family Name/Last Name, ID of the Google or Facebook account, the image associated with the social profile and the IP address. The gathered data is used for the purpose of keeping an account in the system and access restricted/premium content [MODIFY THE PURPOSE AS REQUIRED]. The data is stored in the Web server ([INCLUDE HOSTING PROVIDER AND GEOGRAPHIC LOCATION HERE]). The procedure to delete a User account registered using these methods is:
- Visit the Website.
- Log in (if you don't have access to your Google or Facebook account, use the "Forgot Password?" option and follow the instructions).
- After logging in, click the user icon at the top-right.
- In the drop-down menu, select "Administration".
- Inside the administration interface, click "My Account".
- Once inside your profile, click the "Privacy" tab.
- Click "Delete my account".
Finally, although after deleting the User account our system has no access to your Google or Facebook data, if you want to remove/revoke/deauthorize the access to our login application, in Google or Facebook, you'll find the instructions in the following documents:
- Google: https://support.google.com/accounts/answer/3466521#remove-access
- Facebook: https://www.facebook.com/help/942196655898243/manage-your-apps
NOTE: In case of having any issue in the process, you can write us to the E-Mail address detailed in this Privacy Policy.
5. The home page of your WebTV must have a link to your privacy policy (a good place for this would be the footer).
6. The URL of the privacy policy page must never change and you will need to provide it to Google during the configuration process.
IMPORTANT: YOU SHOULD NOT MOVE TO THE NEXT STAGE IF YOU DON'T MEET THE PREVIOUS REQUIREMENTS.
Stage 2: Creating the "App" on Google and linking it to the WebTV.
1. Visit https://console.cloud.google.com/projectcreate to create a New Project ... Enter the "Project name" and click CREATE.
Note:
Skip this step if you plan to use an existing project for the Sign In App. In this case, simply log into the Google Console.

2. Now it is necessary to configure de consent screen (this is where the user will be asked whether it authorizes your application to access its personal data):
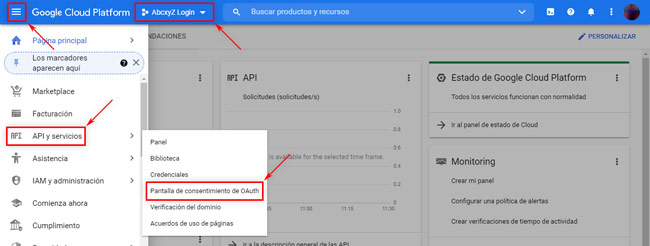
-
Make sure the project is selected in the top bar.
- Open the left menu
- Look for the "APIs & Services" option and select "OAuth consent screen".
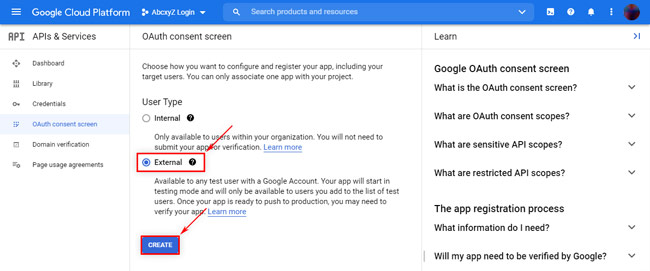
3. If this is the first time you configure the Oauth consent screen then select "External" as User Type and click CREATE:
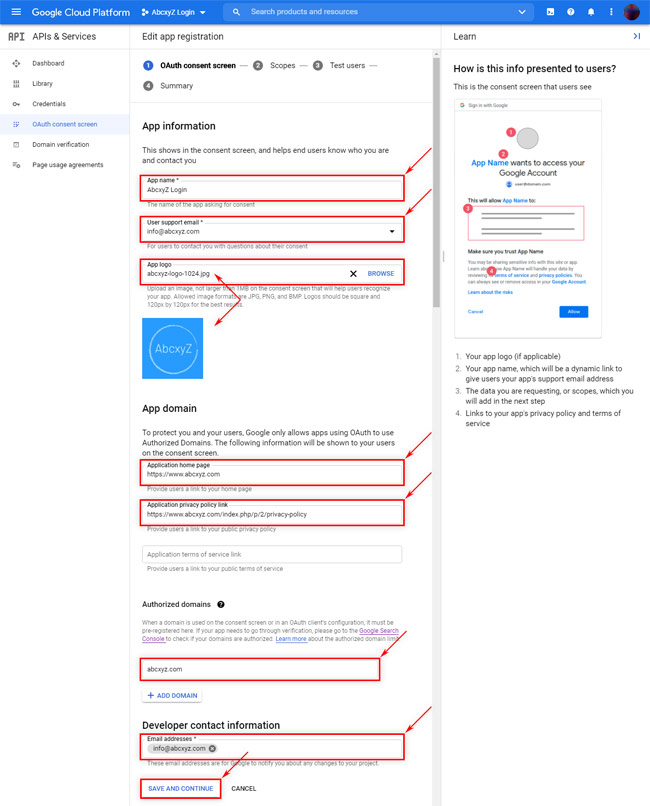
4. Enter basic App details:
App information
- "App name": The name your users will see when Google presents the consent screen to them.
- "User support email": The contact E-Mail in case your Users need to contact you regarding the App.
- "App Logo": Upload an image for the App. For example, the Logo you are using for the WebTV, in square format.
App domain
- "Application home page": This is the URL of your WebTV.
- "Application privacy policy link": Remember what we explained in Stage 1? Well this is the URL to the Privacy Policy Page in your WebTV.
- "Authorized domains": Add the the domain of your WebTV; for example if the URL of your WebTV is https://www.abcxyz.com then the domain is abcxyz.com.
Developer contact information
- "Email addresses": Provide the contact E-Mail in case Google needs to contact you regarding the App.
- Click "SAVE AND CONTINUE".
5. Add the required scopes:
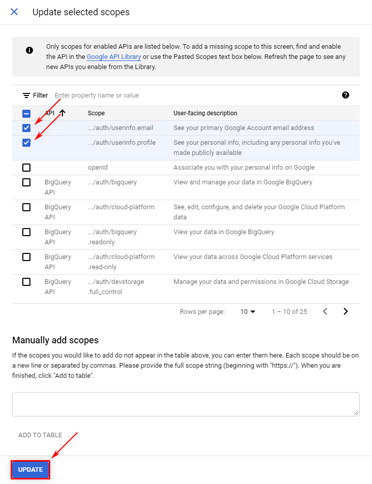
- Click "ADD OR REMOVE SCOPES"

...In the sliding menu:
- Select the following two scopes:
.../auth/userinfo.email
.../auth/userinfo.profile
- Click "UPDATE" (at the bottom).
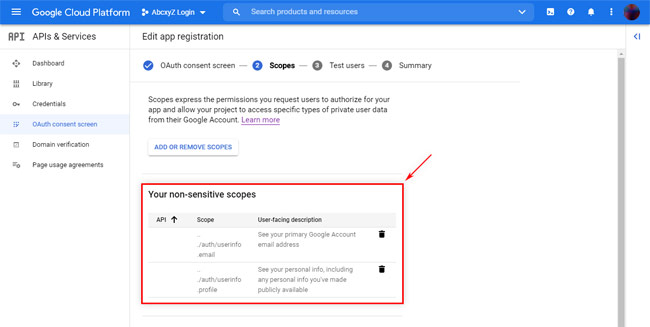
...Verify that the scopes were added into the section "Your non-sensitive scopes" ... then click "SAVE AND CONTINUE".
6. In the "Test users" screen simply click "SAVE AND CONTINUE".
7. When the "Summary" screen is presented, scroll down and click "BACK TO DASHBOARD".
8. Now it is necessary to create the credentials:
- In the left menu, click "Credentials".
- Then click the "+ CREATE CREDENTIALS" link at the top of the page, then select "OAuth client ID".

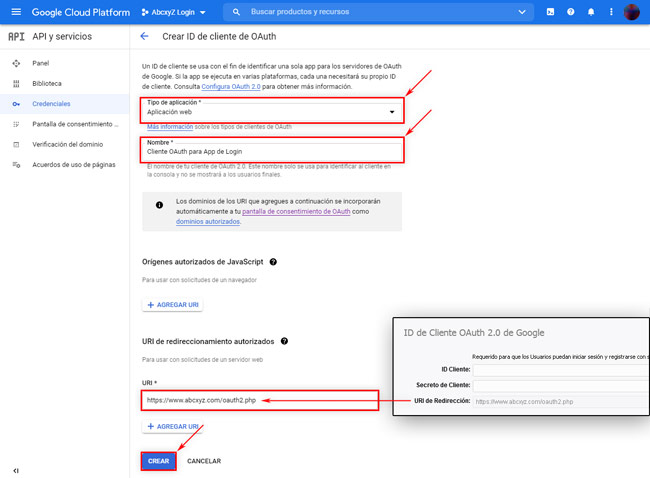
9. In the "Create OAuth client ID" screen provide the required info:
- "Application type": Select "Web application".
- "Name": Enter a name for your reference (it will only be visible for you).
- Below, in the "Authorized redirect URIs", enter the URL provided by the WebTV in Configuration > General > External APIs / Google OAuth 2.0 Client ID.
- Then click "CREATE"
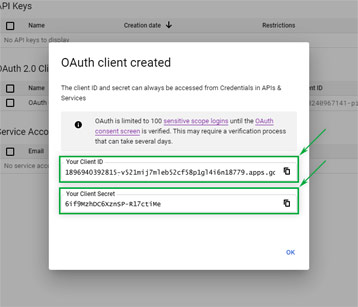
Get/write-down/copy "Your Client ID" and "Your Client Secret". Note that once your App is published you'll need to enter these into your WebTV in Configuration > General > External APIs / Google OAuth 2.0 Client ID.
10. Now it is necessary to add the domain verification:
- In the left menu, click "Domain verification".
- Then click "Add domain".

...In the "Configure webhook notifications for ..." floating box enter the domain of your WebTV; for example if the URL of your WebTV is https://www.abcxyz.com then the domain is abcxyz.com.
IMPORTANT: This domain must have been previously added and verified in the Google Search Console.
...Click "ADD DOMAIN" and the domain will be added to the allowed domain list:

11. Almost done... You should now be ready to publish your App.
At the left menu, click "OAuth consent screen" again... and then click "PUBLISH APP.
IMPORTANT: Google will follow you to the verification steps. In the last screen of the verification steps, you will be prompted to provide optional information and you'll find a text area where you can write some lines of texts. Make sure to explain that the intention of the App is to make it easier for your users to register in your Website and that the "Continue with Google" button will be located in the "Login" and "Register" screens.

...Once your App gets approved (this process may take some days) the "Verification Status" will change to "Verified" and the "Publishing Status" will change to "In production":
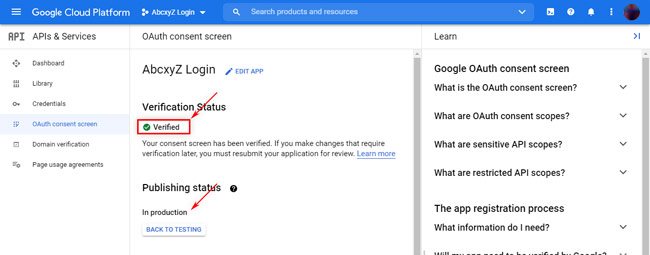
12. Finally... Now that your app is "verified" and "in production" you will need need to enter the "Client ID" and "Client Secret" (from step 9) into the corresponding WebTV section: Configuration > General > External APIs / Google OAuth 2.0 Client ID

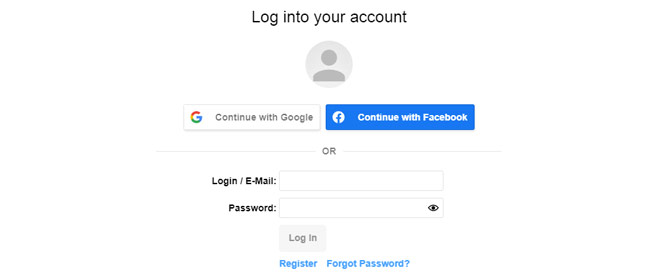
Done! Now, when a User visits the login or registration page, it will find the social login options above the form.
Note that what you see in following image is the result of having both social login options enabled (Google and Facebook).
