- February 21, 2025NEWPostfixes v3 for WS.WebTV 61 available


Content/Administration > Users
Advanced User Management extension: E-Mailing
Rev Aug 3, 2016Description:
Configuring the WebTV to send newsletters and creating messagesRequirements of this tutorial:
• Previous understanding on how to create/edit Galleries.• Your WebTV must have the Advanced User Management extension.
• WS.WebTV version 2.0 or higher.
Notes:
• Version used for the screen captures: WS.WebTV Professional 2.0 (all extensions enabled). Some options/features might be different, respect your WebTV, depending on the installed version and extensions you have purchased.• The interface may be slightly different depending on the Web browser and operating system.
Configuring E-Mailing Functionality and Enabling New Content Digest
The first thing you need to do is configure the E-Mailing functionality. In order to do this go to Configuration > E-Mailing.
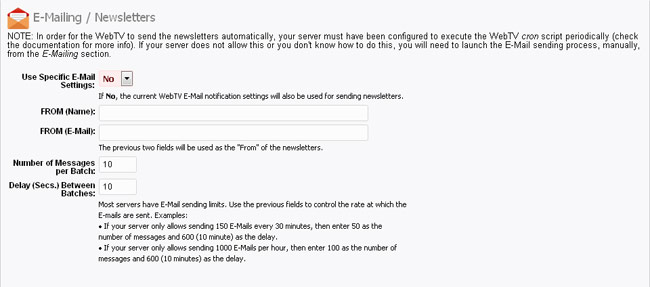
• Use Specific E-Mail Settings: If you select No the E-Mailing system will use the same configuration used by the WebTV to send the notification messages. If you select Yes then you will be presented with additional options.
• FROM (Name): When people receive the messages this is the name that they will see as "From". Note that some servers ignore this and use the FROM (E-Mail) as "From".
• FROM (E-Mail): When people receive the messages this is the E-Mail address that will appear as the sender.
• Number of Messages per Batch: Amount of E-Mails that will be sent at once, per batch.
• Delay (Secs.) Between Batches: Amount of seconds the system will wait before sending another batch of E-Mails.
Most servers have E-Mail sending limits. Use these fields to control the rate at which the E-mails are sent.
New Content Digest
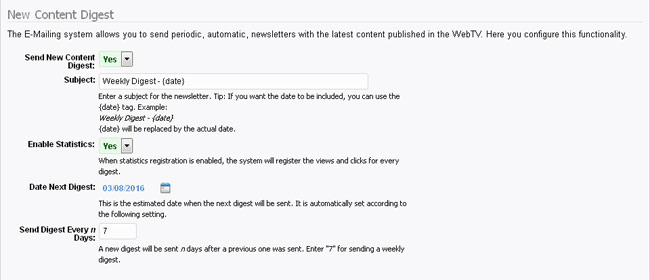
It is possible to configure the WebTV to generate periodic newsletters with an overview of the latest content published in the Site; in this section you can configure this functionality.
• Send New Content Digest: Whether to enable this functionality or not.
• Subject: Enter a subject for the newsletter. If you want the date to be included, you can use the {date} tag, which will be replaced by the actual date when the newsletter is generated.
Example:
Input:
Weekly Digest - {date}
Result: Weekly Digest - 08/03/2016
• Enable Statistics: Whether to enable statistics (views and clicks counters) for the newsletter.
• Date Next Digest: It is the estimated date when the next digest will be generated and sent. This date is normally set, automatically, by the system (according to the value of next field), but you can modify it if you want.
• Send Digest Every n Days: A new digest will be generated and sent n days after a previous one was sent. If you enter "7" then a weekly digest will be sent.
NOTE: The digest will include content whose date is between "Date Next Digest" and "Date Next Digest" minus "Send Digest Every n Days". So, if "Send Digest Every n Days" is 7 then the Digest will include content whose date is up to 7 days old respect the "Date Next Digest".
• Content selection: Below the aforementioned options you will be able to select what content, a how much, to include into the digests.
User E-mailing Preferences
WebTV Users (by editing its account) will be able to set two options (enabled by default) for receiving newsletters/messages:
• Receive Site News: Whether to receive messages created from E-Mailing > New Message.
• Receive New Content Digest: Whether to receive the New Content Digest newsletter.
Creating a Message
In this section we explain how to create a Message/Newsletter.
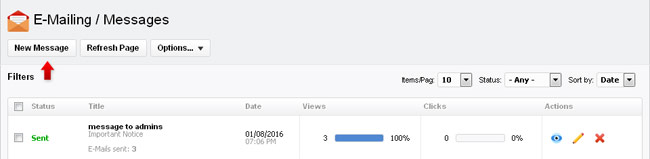
Go to E-mailing and click the New Message button
NOTE: The messages created this way will be considered as "Site News" from the perspective of the User E-Mailing
Preferences
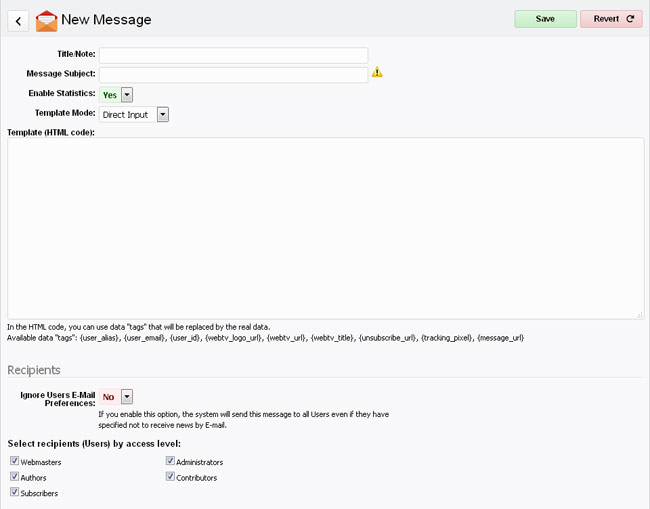
The New Message screen will appear with the following options:
• Title/Note: This is for your personal reference only.
• Message Subject: This is the actual subject of the message.
• Enable Statistics: Whether to enable statistics (views and clicks counters) for the message.
• Template Mode:
- Direct input:
Will allow you to enter the HTML code of the message directly into the text area.
-
Template File: Will allow you to upload a HTML file which contains the template for the message.
Download sample template files (right-click and select "save link as" or "save target as"):
Very simple template
Template with formatting
You can create/edit your E-Mail templates with any HTML editor; additionally, in the HTML code, you can use data "tags" that will be replaced (when sending/previewing) by the real data.
Available data "tags": {user_alias}, {user_email}, {user_id}, {webtv_logo_url}, {webtv_url}, {webtv_title}, {unsubscribe_url}, {tracking_pixel}, {message_url}
• Recipients: In this section you can select which WebTV Users (by access level) will receive the message; additionally, you can decide whether to ignore or not the User E-mailing preferences.
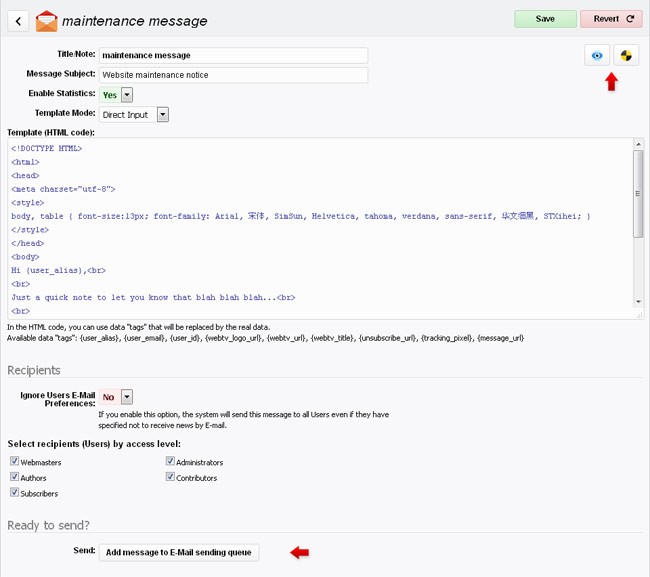
Save when you are ready. If all necessary information has been provided then, after saving you will see the preview, test and send options.
NOTES:
-
In case you do not provide a subject, or template, the aforementioned options will not appear.
- When you modify certain information from the message, a warning
icon will appear inside the Save button; this will indicate that you need to save the message so that the missing options appear again.
This is how the message editing screen will look like after saving the message with all required information. Note the new options:
- Top-right: "Eye" icon (for previewing the message); "Target"
icon (for sending a test message to yourself).
- At the bottom: Send (Add message to E-Mail sending queue). Click this button when you are ready to send the message.
Ready to send?
When you have finished editing your message, and you are ready to send it, then click the "Add message to E-Mail sending queue": The message will change its status to "Sending" in the message list.
[Don't stop reading here! ...make sure to read the following "E-MAIL Sending Process" section].
E-Mail Sending Process
In order for the WebTV to be able to send the messages added to the sending queue ("sending" status), it is necessary to launch the sending process.
The WebTV can use two methods for launching this process: Automatic and Manual.
Sending E-Mails automatically
This method requires that you set a cron job in your server
so that it visits the <webtv_url>/cron.php script automatically, at regular intervals (every hour or, if possible, every 30 or 15 minutes). Note that the script must be executed using its absolute URL with a lynx, wget or curl cron command.
Cron command example:
curl --silent --user-agent Server-Cron "http://WEBTV_URL/cron.php" >/dev/null 2>&1
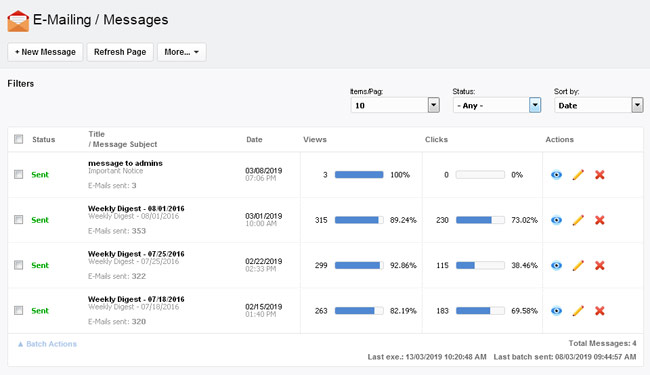
Did you set the cron job already? Then, just wait and see the progress of the E-mail sending (at the bottom of the message list you will find info regarding the last execution and last batch sent)...
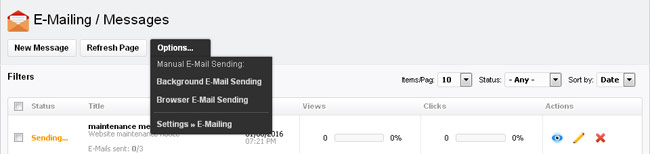
Sending E-Mails manually
In case your server does not support cron jobs, or you can't set a cron job in your server for whatever reason, then the WebTV has two manual options for sending the messages with "sending" status. Click the Options button and you will see them:
- Background E-Mail Sending: This function will launch the E-Mail sending process in the background (server-side). Then you can monitor the sending progress by refreshing the message list.
- Browser E-Mail Sending: This function will open a popup where you will see the E-Mail sending progress.
The advantage of this method is that it does not require anything special in your server...
The drawback of this method is that you must leave the popup open in order for the E-mails to be sent.